Nuxt.jsプロジェクトの作成
Nuxt.js + TypeScript(+ tslint)プロジェクトの作成手順
Firebaseプロジェクトの作成
https://console.firebase.google.comでFirebaseプロジェクトを作成することができます。
また、Authenticationの「ログイン方法」タブでメール/パスワードによる認証とGoogleログインを有効にしておきます。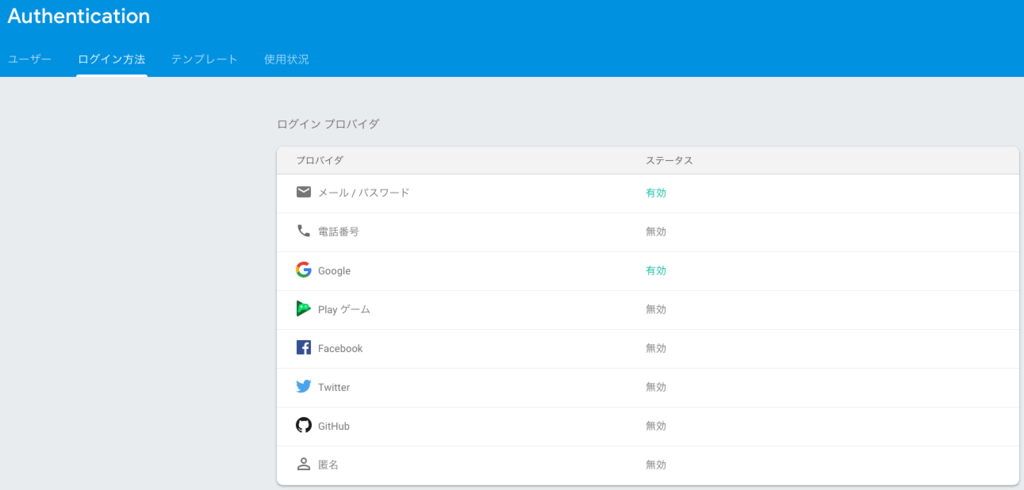
Firebase SDKの準備
プロジェクトにfirebaseパッケージを追加します。
$ yarn add firebase次に、先程作成したプロジェクトページから接続情報を取得します。 プロジェクトページ上段の画像のボタンをクリックすると認証情報が表示できます。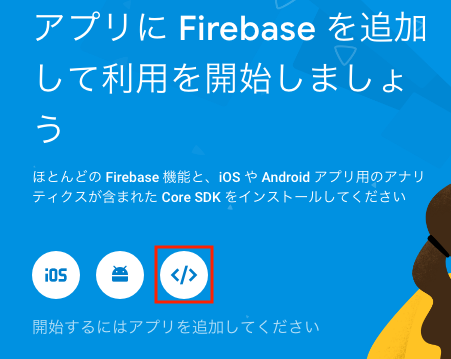
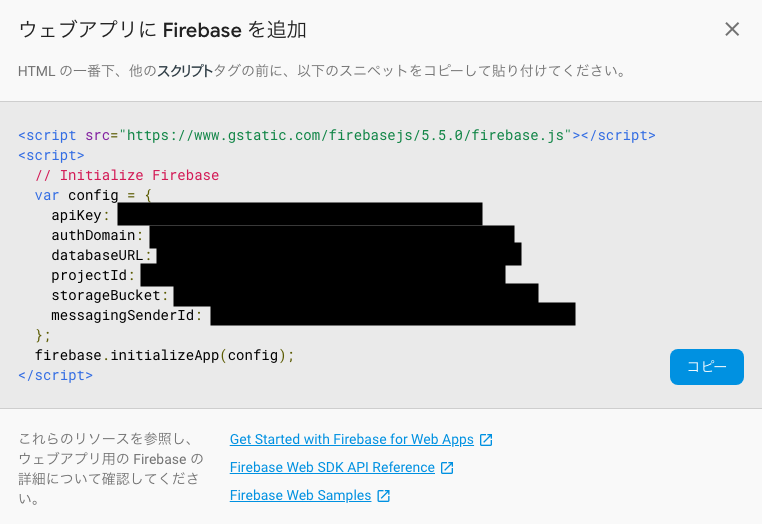
これを使用して初期化処理を書きます。
// ~/plugins/firebase.ts
import firebase from "firebase"

const config = {
  apiKey: "xxxx",
  authDomain: "xxxx",
  databaseURL: "xxxx",
  projectId: "xxxx",
  storageBucket: "xxxx",
  messagingSenderId: "xxxx"
}
const googleProvider = new firebase.auth.GoogleAuthProvider()

export default !firebase.apps.length ? firebase.initializeApp(config) : firebase.app()
export { googleProvider }
他のファイルでfirebaseを使用したいときは、このファイルをimportするようにします。
import firebase from "~/plugins/firebase"なお、googleProviderは、Firebase AuthenticationでGoogleログインを実装するための前準備です。 詳細はhttps://firebase.google.com/docs/auth/web/google-signin?hl=jaを参照のこと。
サインアップ/サインイン用のページ作成
<template>
  <div>
    <div class="row">
      <div class="col s12 offset-m3 m6">
        <div class="card">
          <div class="card-content">
            <span class="card-title">Sign in</span>
            <p>
              <div class="row">
                <div class="col s12">
                  <email-signin></email-signin>
                </div>
              </div>
              <div class="row">
                <div class="col s12">
                  <google-signin></google-signin>
                </div>
              </div>
            </p>
          </div>
        </div>
      </div>
    </div>
    <div class="row">
      <div class="col s12 offset-m3 m6">
        <div class="card">
          <div class="card-content">
            <span class="card-title">Sign up</span>
            <p>
              <div class="row">
                <div class="col s12">
                  <email-signup></email-signup>
                </div>
              </div>
            </p>
          </div>
        </div>
      </div>
    </div>
  </div>
</template>

<script lang="ts">
import {
  Component,
  Vue
} from "nuxt-property-decorator"
import EmailSignin from "~/components/EmailSignin"
import EmailSignup from "~/components/EmailSignup"
import GoogleSignin from "~/components/GoogleSignin"
import firebase from "~/plugins/firebase"

@Component({
  components: {
    EmailSignin,
    EmailSignup,
    GoogleSignin
  }
})
export default class extends Vue {
}
</script>
このページは以下のコンポーネントを含んでいます。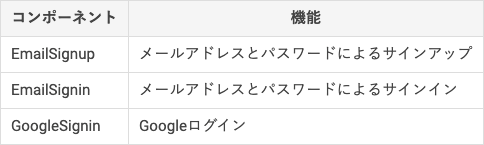
次の章からは、これらのコンポーネントを実装していきます。
なお、今回はCSSフレームワークとしてMaterializeを使用しています。
コンポーネントの実装
EmailとPasswordによるサインアップ
参考: https://firebase.google.com/docs/auth/web/password-auth?hl=ja
<template>
	  <div>
	    <div class="row">
	      <div class="col s12">
	        <input type="text" placeholder="E-mail" v-model="email">
	        <input type="password" placeholder="Password" v-model="password">
	      </div>
	    </div>
	    <div class="row">
	      <div class="col s12">
	        <button class="waves-light waves-effect btn blue" @click="signupWithEmailAndPassword">Register</button>
	      </div>
	    </div>
	  </div>
	</template>


	<script lang="ts">
	import {
	  Component,
	  Provide,
	  Vue
	} from "nuxt-property-decorator"
	import firebase from "~/plugins/firebase"

	@Component({})
	export default class EmailSignup extends Vue {
	  @Provide()
	  private email: string = ""

	  @Provide()
	  private password: string = ""

	  private signupWithEmailAndPassword () {
	    firebase.auth().createUserWithEmailAndPassword(this.email, this.password)
	      .catch((error) => {
	        alert(error.message)
	      })
	  }
	}
</script>firebase.auth().createUserWithEmailAndPasswordにemailとpasswordを渡すだけでサインアップ処理が完了します。
メールアドレスやパスワードが不正の場合など、何かエラーが出た場合はcatchで捕捉できます。
EmailとPasswordによるサインイン
<template>
	  <div>
	    <div class="row">
	      <div class="col s12">
	        <input type="text" placeholder="E-mail" v-model="email">
	        <input type="password" placeholder="Password" v-model="password">
	      </div>
	    </div>
	    <div class="row">
	      <div class="col s12">
	        <button class="waves-light waves-effect btn blue" @click="signinWithEmailAndPassword">Sign in</button>
	      </div>
	    </div>
	  </div>
	</template>


	<script lang="ts">
	import {
	  Component,
	  Provide,
	  Vue
	} from "nuxt-property-decorator"
	import firebase from "~/plugins/firebase"

	@Component({})
	export default class EmailSignin extends Vue {
	  @Provide()
	  private email: string = ""

	  @Provide()
	  private password: string = ""

	  private signinWithEmailAndPassword () {
	    firebase.auth().signInWithEmailAndPassword(this.email, this.password)
	      .catch((error) => {
	        alert(error.message)
	      })
	  }
	}
	</script>
サインアップの時の似ていますが、clickした時の関数がサインイン用のものになっています。
Googleログイン
参考: https://firebase.google.com/docs/auth/web/google-signin?hl=ja
<template>
	  <a class="google-signin" @click="signInWithGoogleRedirect"></a>
	</template>


	<script lang="ts">
	import {
	  Component,
	  Vue
	} from "nuxt-property-decorator"
	import firebase, { googleProvider } from "~/plugins/firebase"

	@Component({})
	export default class GoogleSignin extends Vue {
	  public signInWithGoogleRedirect () {
	    firebase.auth().signInWithRedirect(googleProvider)
	  }
	}
	</script>


	<style scoped>
	  a.google-signin {
	    display: block;
	    cursor: pointer;
	    background-image: url(~/assets/images/btn_google_signin_dark_normal_web.png);
	    width: 191px;
	    height: 46px;
	  }
</style>Googleログイン用のボタンはhttps://developers.google.com/identity/branding-guidelinesから拾ってこれます。
ログイン中のユーザー情報の保持
サインアップ/サインイン機能に関してはここまでの内容で完了ですが、実際にユーザー情報を使用するためには、ユーザー情報をどこかに保持しておかなければなりません。
今回はVuexストアを使って、ページ遷移のたびにユーザー情報を取得することにしました。
Vuexストアの準備
ユーザーを保持するためのVuexストアを作成します。 モジュールモードで定義しています。
Vuex ストア - Nuxt.js
// index.ts
export const strict = false
// user.ts
export const state = () => ({
user: null
})
export const getters = {
uid(state) {
if (state.user && state.user.uid) return state.user.uid
else return null
},
user(state) {
return state.user
},
isAuthenticated(state) {
return !!state.user && !!state.user.uid
}
}
export const mutations = {
setUser (state, user) {
state.user = user
}
}Do not mutate vuex store state outside mutation handlersエラーを無効にするため、strictモードはオフにします。
参考: Error: [vuex] Do not mutate vuex store state outside mutation handlers · Issue #1917 · nuxt/nuxt.js · GitHub
ページ遷移時にユーザー情報をセット
plugins/auth.tsを作成し、ページ遷移の際に、ユーザー情報をストアに設定するようにします。
https://firebase.google.com/docs/auth/web/manage-users?hl=ja#get_the_currently_signed_in_userの通り、onAuthStateChangedを使用してログイン中のユーザー情報を取得します。
// auth.ts
import firebase from "~/plugins/firebase"

export default ({ app, redirect, store }) => {
  app.router.afterEach((to, from) => {
    firebase.auth().onAuthStateChanged((user) => {
      store.commit("user/setUser", user)

      if (user) {
        if (to.name === "signin") {
          redirect("/")
        }
      }
    })
  })
}上記の処理がロード時に読み込まれるように、nuxt.config.jsに以下の設定を追加します。
このとき、クライアント側でのみ処理を行いたいため、ssr: falseを指定します。
  plugins: [
    { src: "~/plugins/auth.ts", ssr: false }
  ]
また、以下の部分はサインインが完了しているのにサインインページにアクセスしようとした際に、トップページにリダイレクトする処理となっています。
if (user) {
  if (to.name === "signin") {
    redirect("/")
  }
}
// nuxt.config/js
const parseArgs = require("minimist")
const argv = parseArgs(process.argv.slice(2), {
alias: {
H: "hostname",
p: "port"
},
string: ["H"],
unknown: parameter => false
})
const port =
argv.port ||
process.env.PORT ||
process.env.npm_package_config_nuxt_port ||
"3000"
const host =
argv.hostname ||
process.env.HOST ||
process.env.npm_package_config_nuxt_host ||
"localhost"
module.exports = {
env: {
baseUrl:
process.env.BASE_URL ||
`http://${host}:${port}`
},
head: {
title: "Ebay Templates",
meta: [
{ charset: "utf-8" },
{
name: "viewport",
content:
"width=device-width, initial-scale=1"
},
{
hid: "description",
name: "description",
content: "Nuxt.js project"
}
],
script: [
{ src: "materialize.min.js" }
],
link: [
{
rel: 'stylesheet',
href: "https://fonts.googleapis.com/icon?family=Material+Icons"
},
{
rel: "icon",
type: "image/x-icon",
href: "/favicon.ico"
}
]
},
/*
** Customize the progress-bar color
*/
loading: { color: "#3B8070" },
/*
** Build configuration
*/
css: [
'~/assets/sass/materialize.scss',
"~/assets/css/main.css"
],
build: {
extend (config, { isDev, isClient }) {
if (isDev && isClient) {
config.module.rules.push({
test: /\.ts$/,
enforce: 'pre',
loader: 'tslint-loader',
options: {
configFile: 'tslint.json',
tsConfigFile: 'tsconfig.json',
},
})
}
},
},
modules: [
"@nuxtjs/axios",
"~/modules/typescript.js"
],
axios: {},
plugins: [
{ src: "~/plugins/auth.ts", ssr: false }
]
}まとめ
今回はNuxt.jsとFirebase Authenticationで遊んでみました。
とても簡単に認証機能が実装できるFirebase Authenticationですが、実際のサービスを作るためにはFirestoreを使用してユーザーとデータを紐付ける必要があります。
今回でFirebase Authenticationは全貌は掴めたので、次回はFirestoreも触れたら良いなと思います。