はじめに
はじめまして、@h_sakanoと申します。
このエントリーは、Firebase Advent Calendar 2018の4日目の記事です。
Vue.jsでFirebaseの主要なサービスを取扱う方法を、サンプルを交えながら紹介します。
- Firebase Hosting
- Firebase Authentication
- Cloud Firestore
- Cloud Functions for Firebase
- Cloud Storage
今回使用するサンプルのリポジトリ
https://github.com/h-sakano/advent-calendar-2018-app
目次
- はじめに
- 今回使用するサンプルのリポジトリ
- 目次
- Vueプロジェクトの作成
- Vue CLI 3のインストール
- Vueプロジェクトの作成
- 動作確認
- Firebaseのプロジェクト作成
- Vueプロジェクトのデプロイ(Firebase Hosting)
- Firebase CLIのインストール
- Firebase Hostingの初期設定
- Vue プロジェクトのビルド
- Firebase Hostingへのデプロイ
- CIを使用したデプロイ
- CircleCIでの設定例
- VueプロジェクトにおけるFirebaseの初期設定
- VueプロジェクトにFirebase SDKをインストール
- Firebaseプロジェクト接続用のコードスニペットを確認
- 接続用コードスニペットをVueプロジェクトに貼り付け
- 認証機能の実装(Firebase Authentication)
- Firebase Authenticationを有効にする
- サインイン/サインアップ機能の追加
- Firebase UIで実装
- サインイン/サインアップの動作確認
- ユーザー認証情報の保持
- ナビゲーションガードの実装
- マイページの作成
- サインアウト機能
- データの保存(Cloud Firestore)
- Firestoreの有効化
- Firestoreの初期設定
- サインイン時にユーザーをFirestoreに登録する
- プロフィールテキストの保存
- サーバーでの処理実装(Cloud Functions for Firebase)
- Cloud Functionsの初期設定
- サニタイズを行う関数の定義
- 必要パッケージのインストール
- 関数定義
- Cloud Functionsへのデプロイ
- クライアント側からの呼び出し
- プロフィール画像のアップロード(Cloud Storage)
- Cloud Storageの初期設定
- Cloud Storageへの画像の保存と表示
- まとめ
Vueプロジェクトの作成
Vue CLI 3のインストール
今回はVueコミュニティ公式のコマンドラインツールである「Vue CLI 3」を使用してプロジェクトを作成します。
まだインストールされていない方は、インストールしてください。
$ yarn global add @vue/cliパッケージ名がVue CLI 2系まで(vue-cli)とVue CLI 3系(@vue/cli)で異なっているので注意が必要です。
Vueプロジェクトの作成
vue create <プロジェクト名>コマンドを使用すると対話形式でプロジェクト作成を行うことができます。
プロジェクト作成が完了するとカレントディレクトリに指定したプロジェクト名のディレクトリが作成され、その中に必要なファイルが展開されます。
$ vue create advent-calendar-2018-app
Vue CLI v3.2.1
? Please pick a preset: Manually select features
? Check the features needed for your project: Babel, TS, Router, Vuex, CSS Pre-processors, Linter
? Use class-style component syntax? Yes
? Use Babel alongside TypeScript for auto-detected polyfills? Yes
? Use history mode for router? (Requires proper server setup for index fallback in production) Yes
? Pick a CSS pre-processor (PostCSS, Autoprefixer and CSS Modules are supported by default): Sass/SC
SS
? Pick a linter / formatter config: TSLint
? Pick additional lint features: Lint on save, Lint and fix on commit
? Where do you prefer placing config for Babel, PostCSS, ESLint, etc.? In dedicated config files
? Save this as a preset for future projects? (y/N) No
Router(Vue Router)は画面遷移を管理するためのライブラリで、Vue.jsコミュニティがメンテナンスしています。
一応、他のルータを選択できるように、オプションとなっておりますが、基本的にはVue Routerを使用すればOKです。
また、Vuexはアプリの状態管理を行うためのライブラリです。
今回は認証データを格納するのに使用します。
Vue CLI 3を使用してプロジェクトを作成する際には、TypeScriptも簡単に導入できます。
TypeScriptを使用したい場合はCheck the features needed for your project:でTypeScriptとLinterを選択し、LinterにはTSLintを選択すると良いでしょう。
動作確認
$ cd advent-calendar-2018-app
$ yarn run serve
 DONE  Compiled successfully in 5895ms                                                       1:48:09

No type errors found
No lint errors found
Version: typescript 3.2.1, tslint 5.11.0
Time: 4695ms

  App running at:
  - Local:   http://localhost:8080/
  - Network: http://192.168.0.2:8080/

  Note that the development build is not optimized.
To create a production build, run yarn build.http://localhost:8080にブラウザでアクセスして、以下の画面が表示されていればプロジェクト作成成功です。
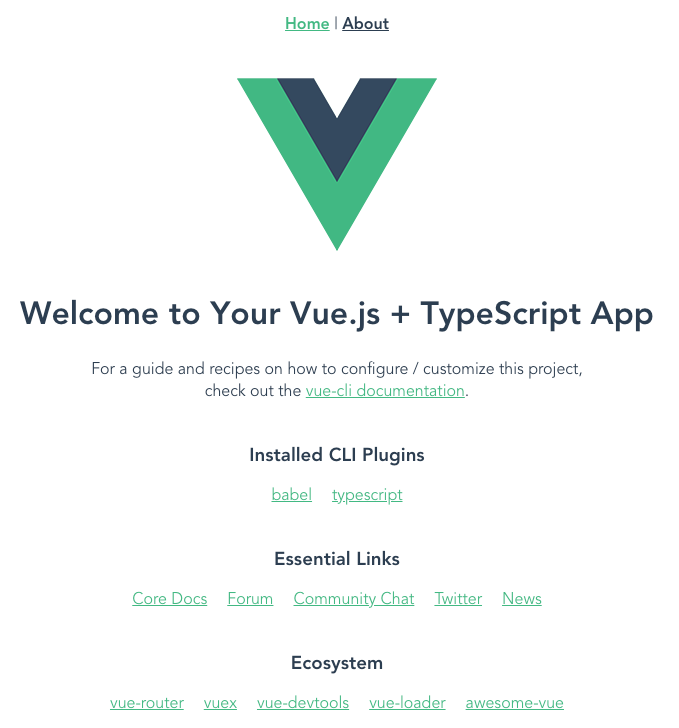
アプリ初期画面
表示できない場合は、他のプロセスがポート8080をLISTENしてないかなど、確認してください。
以下のように起動ポートを指定して起動することもできます。
$ yarn run serve --port 3333
 DONE  Compiled successfully in 4605ms                                                       1:52:33

Type checking and linting in progress...

  App running at:
  - Local:   http://localhost:3333/
  - Network: http://192.168.0.2:3333/

  Note that the development build is not optimized.
  To create a production build, run yarn build.

No type errors found
No lint errors found
Version: typescript 3.2.1, tslint 5.11.0
Time: 5099ms
Firebaseのプロジェクト作成
Firebaseコンソールでプロジェクトの追加を行います。
なお、Firebaseでプロジェクトを作成するには、Googleアカウントが必要です。
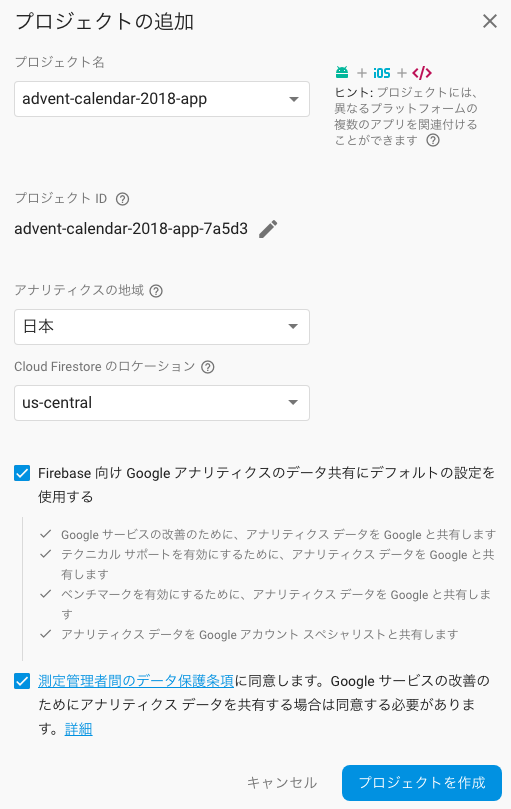
Firebaseプロジェクトの作成
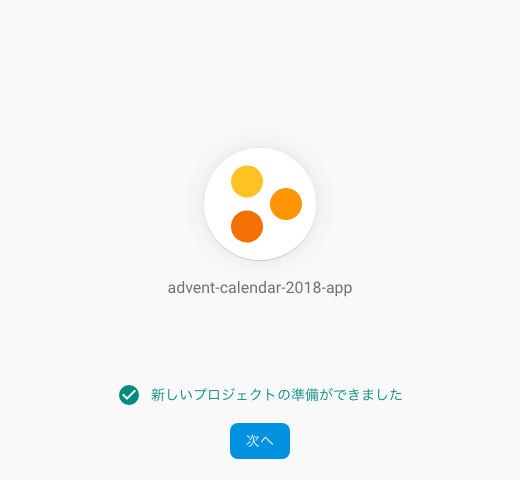
Firebaseプロジェクト作成完了
Vueプロジェクトのデプロイ(Firebase Hosting)
Webアプリの開発に入る前に、どのようにインターネット上に公開するのかを先に紹介しておきます。
Firebase Hostingを使うと、簡単に素早くWebアプリを配信できるのでおすすめです。
よって、ここではFirebase Hostingの使用方法を紹介します。
Firebase CLIのインストール
Firebase Hostingへデプロイするためにはfirebase-toolsパッケージ(Firebase CLI)のインストールが必要です。firebase-toolsは後述するCloud Functions for FirebaseやCloud Firestoreのセキュリティルールを設定する際にも必要になりますのでインストールしておきます。
$ yarn global add firebase-tools
or
$ npm i --global firebase-tools
Firebase CLIを使用してFirebaseにログインします。
プロジェクト作成時に使用したGoogleアカウントでログインしてください。
$ firebase loginこれでFirebase CLIを使用する準備ができました。
Firebase Hostingの初期設定
firebase initコマンドを使用して、Firebase Hosting初期設定を行います。
初期設定を行うサービスを聞かれるので、Hostingを選択します。
$ firebase init
(node:83155) ExperimentalWarning: The fs.promises API is experimental

     ######## #### ########  ######## ########     ###     ######  ########
     ##        ##  ##     ## ##       ##     ##  ##   ##  ##       ##
     ######    ##  ########  ######   ########  #########  ######  ######
     ##        ##  ##    ##  ##       ##     ## ##     ##       ## ##
     ##       #### ##     ## ######## ########  ##     ##  ######  ########

You're about to initialize a Firebase project in this directory:

  /Users/hiroki-sakano/workspace/advent-calendar-2018-app

? Which Firebase CLI features do you want to setup for this folder? Press Space to select features,
then Enter to confirm your choices. Hosting: Configure and deploy Firebase Hosting sites

=== Project Setup

First, let's associate this project directory with a Firebase project.
You can create multiple project aliases by running firebase use --add,
but for now we'll just set up a default project.

? Select a default Firebase project for this directory: advent-calendar-2018-app-7a5d3 (advent-calen
dar-2018-app)
i  Using project advent-calendar-2018-app-7a5d3 (advent-calendar-2018-app)

=== Hosting Setup

Your public directory is the folder (relative to your project directory) that
will contain Hosting assets to be uploaded with firebase deploy. If you
have a build process for your assets, use your build's output directory.

? What do you want to use as your public directory? dist
? Configure as a single-page app (rewrite all urls to /index.html)? (y/N) Yes
? File public/index.html already exists. Overwrite? No
i  Skipping write of public/index.html

i  Writing configuration info to firebase.json...
i  Writing project information to .firebaserc...

✔  Firebase initialization complete!
What do you want to use as your public directory?のところはdistと入力します。
Vue CLI 3で作成されたプロジェクトのビルドコマンドがデフォルトでdistにビルドの成果物を格納するようになっているためです。
Vue プロジェクトのビルド
まず、Vueプロジェクトをビルドします。
$ yarn run buildビルドが完了するとdistディレクトリにビルドの成果物が生成されます。
Firebase Hostingへのデプロイ
$ firebase deploy --only hosting
(node:83859) ExperimentalWarning: The fs.promises API is experimental

=== Deploying to 'advent-calendar-2018-app-7a5d3'...

i  deploying hosting
i  hosting[advent-calendar-2018-app-7a5d3]: beginning deploy...
i  hosting[advent-calendar-2018-app-7a5d3]: found 10 files in dist
✔  hosting[advent-calendar-2018-app-7a5d3]: file upload complete
i  hosting[advent-calendar-2018-app-7a5d3]: finalizing version...
✔  hosting[advent-calendar-2018-app-7a5d3]: version finalized
i  hosting[advent-calendar-2018-app-7a5d3]: releasing new version...
✔  hosting[advent-calendar-2018-app-7a5d3]: release complete

✔  Deploy complete!

Project Console: https://console.firebase.google.com/project/advent-calendar-2018-app-7a5d3/overview
Hosting URL: https://advent-calendar-2018-app-7a5d3.firebaseapp.comこのコマンドを実行することで、distディレクトリの内容の配信が開始されます。Hosting URL:のところに配信URLが出力されているのでアクセスしてローカル環境と同じ画面が表示されるかを確認します。
https://advent-calendar-2018-app-7a5d3.firebaseapp.com
CIを使用したデプロイ
説明したデプロイの手順を毎回手元でやるのは面倒ですし、ビルドのし忘れ等のヒューマンエラーも懸念されます。
CIを活用して、masterブランチにPushされた内容を自動でデプロイできるようにしたい場合は、以下のコマンドで生成される認証トークンを使用してCIからHostingへのデプロイが可能です。
$ firebase login:ciこれで得られたトークンを利用して、以下のようにデプロイが可能です。
$ firebase deploy --only hosting --token "$FIREBASE_TOKEN"CircleCIでの設定例
参考までに設定ファイルを御覧ください。
今回はデプロイを自動化しているだけですが、実際の運用ではテストもCIで自動化しましょう。
デプロイをCircleCIで自動化
プロジェクトの設定画面から環境変数FIREBASE_TOKENにfirebase login:ciで得られたトークンを設定します。
VueプロジェクトにおけるFirebaseの初期設定
まず、VueでFirebaseの機能を使えるようにするために初期設定を行っていきます。
VueプロジェクトにFirebase SDKをインストール
FirebaseのJavascript版のSDKをインストールします。
$ cd advent-calendar-2018-app
$ yarn add firebase
Firebaseプロジェクト接続用のコードスニペットを確認
FirebaseコンソールのTopにあるボタンから接続情報が確認できます。
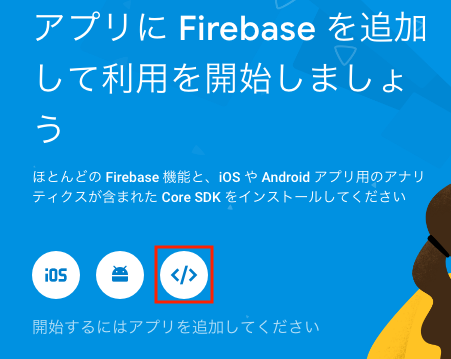
接続情報の確認
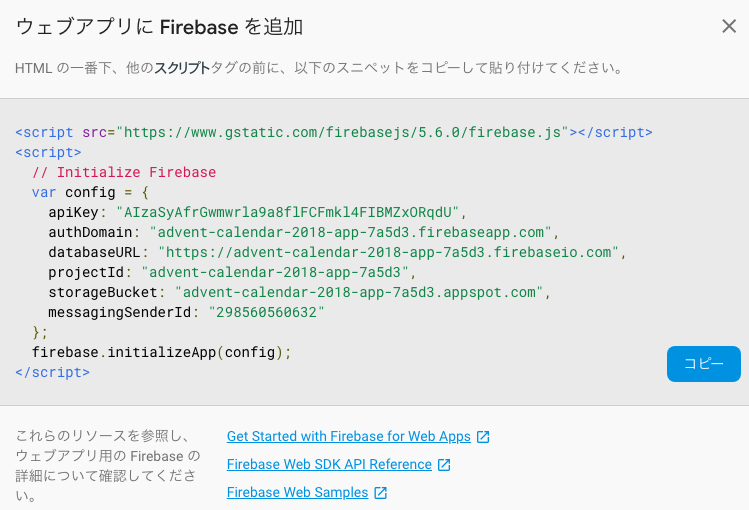
接続情報
接続用コードスニペットをVueプロジェクトに貼り付け
Vue CLI 3を使用してプロジェクトを作成した場合、srcディレクトリの下にmain.tsというファイルが生成されているはずなので、接続情報を貼り付けます。
ただし、そのまま貼り付けるとtslintに怒られると思うので、推奨される書き方に書き換えます。
Firebaseプロジェクトの初期化コードスニペットを貼り付け
認証機能の実装(Firebase Authentication)
Webアプリでは殆どの場合なんらかの認証機能が必要です。
Firebase Authenticationを使用して認証機能を実装しましょう。
Firebase Authenticationを有効にする
まずはFirebaseコンソールで認証機能を有効にしなければなりません。
「Authentication」 => 「ログイン方法」と進み、以下のログイン方法を有効にします。
- メール / パスワード
- 電話番号
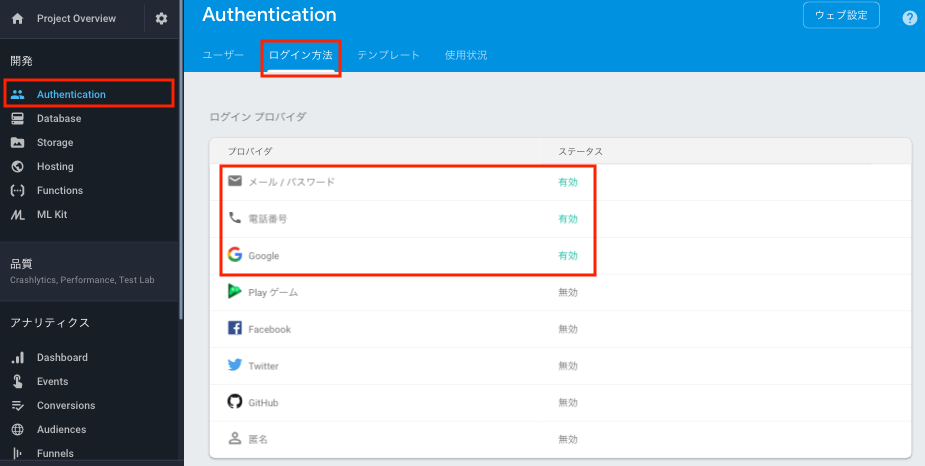
Firebase Authenticationの有効化
サインイン/サインアップ機能の追加
Firebase UIを使用し、サインアップ/サインインを実装
Vue CLI 3を使用してプロジェクトを作成した場合は、予め用意されているviewsディレクトリにSignIn.vueファイルを新規作成します。
また、ルーティングに/signinを追加します。
ルーティングを追加するには、./src/router.tsを編集します。
https://github.com/h-sakano/advent-calendar-2018-app/blob/b01b4f0fa57ad7466a55e2b9688a6275efb15ce9/src/router.ts
Firebase UIで実装
Firebase SDKを使用して自前でサインイン/サインアップの処理を作るよりも、FirebaseUIというパッケージを使用したほうが楽に認証機能が実装できます。
firebaseuiをインストールし、必要なパッケージをSignIn.vueでインポートして画面を作っていきます。
$ yarn add firebaseui
<template>
  <div class="sign-in">
    <h1 class="title is-5">Sign in</h1>
    <div id="firebaseui-auth-container"></div>
  </div>
</template>

<script lang="ts">
import firebase from 'firebase/app'
import 'firebase/auth'
import firebaseui from 'firebaseui'
import 'firebaseui/dist/firebaseui.css'
import { Component, Vue } from 'vue-property-decorator'

@Component
export default class SignIn extends Vue {}
</script>firebaseuiは内部でfirebase/authを使用するので両方とも忘れずにインポートします。
ここまでできたら、mountedライフサイクルフックでFirebase UIを初期化します。
(ライフサイクルフックについては公式の説明がわかりやすいです)
@Component
export default class SignIn extends Vue {
  private mounted () {
    let ui = firebaseui.auth.AuthUI.getInstance()
    if (!ui) {
      ui = new firebaseui.auth.AuthUI(firebase.auth())
    }
    ui.start('#firebaseui-auth-container', {
      signInFlow: 'redirect',
      signInOptions: [
        firebase.auth.GoogleAuthProvider.PROVIDER_ID,
        firebase.auth.EmailAuthProvider.PROVIDER_ID,
        {
          provider: firebase.auth.PhoneAuthProvider.PROVIDER_ID,
          defaultCountry: 'JP',
        },
      ],
      signInSuccessUrl: '/',
    })
  }
}FirebaseUIの初期化の方法とパラメータの説明はhttps://github.com/firebase/firebaseui-webを参照してください。
サインイン/サインアップの動作確認
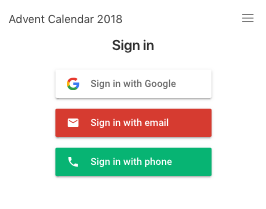
サインイン画面

ユーザー一覧
ユーザー認証情報の保持
サインイン/サインアップ機能はこれで完成ですが、サインインしたユーザーの情報をどこにも保持していないので、ユーザー情報を利用することができません。
ユーザー情報はアプリ内の各ページ・各コンポーネントから適宜使用されることが予想されますが、そのような場合はVuexという集中型の状態管理ライブラリが便利です。
まず、サインインしたユーザー情報を取得するには公式の説明にもあるように、onAuthStateChangedオブザーバーを使用します。
どこでこの関数を呼ぶかは悩みどころですが、私はmain.tsでVuexの初期化を行う際に呼ぶのが良いのではないかと思っています。
// store.ts
  .
  .
  .
  actions: {
    initialize ({ state, commit }): void {
      if (!state.initialized) {
        firebase.auth().onAuthStateChanged((user) => {
          if (user) {
            commit('setUser', user)
          }
          // initializedフラグをtrueにする
          commit('setInitialized')
        })
      }
    },
  },
  .
  .
  .
// main.ts
store.dispatch('initialize')
ナビゲーションガードの実装
Vue Routerのナビゲーションガード機能を使用して、認証状態のフェッチが完了するのを待つことで、ページ遷移に認証状態による制限をかけることができます。
ただし、このナビゲーションガードはあくまでブラウザ上で実行されるため、悪意を持って書き換えることができます。
そのため、Firestoreに保存したユーザーの個人情報などを表示する場合は、ナビゲーションガードに頼らず、セキュリティルール(後述)を適切に設定する必要があります。
例として、ルーティングのmetaフィールドにrequiresAuth: trueがセットされている場合はページ遷移に認証を必要とし、/signinページには未認証の状態のみページ遷移できることとします。
// main.ts
store.dispatch('initialize')

type NextType = (to?: string | false | void | Location | ((vm: Vue) => any) | undefined) => void

// 未認証の場合にsigninページにリダイレクトする処理
const requiresAuthGuard = (next: NextType): void => {
  if (store.getters.isAuthenticated) {
    next()
  } else {
    next({ path: 'signin' })
  }
}

// 認証済の場合にTOPページにリダイレクトする処理
const signinGuard = (next: NextType): void => {
  if (store.getters.isAuthenticated) {
    next({ path: '/' })
  } else {
    next()
  }
}

// storeの初期化が終わるのを待ってページ遷移の可否を判定
const routerGuard = (next: NextType, guard: (next: NextType) => void) => {
  if (!store.getters.isInitialized) {
    // initializedフラグが変わる = 初期化が終わるまで待つ
    const unwatch = store.watch((state) => state.initialized, () => {
      guard(next)
      unwatch()
    })
  } else {
    guard(next)
  }
}

router.beforeEach((to, from, next) => {
  if (to.matched.some((record) => record.meta.requiresAuth)) {
    // ルーティングのmetaプロパティに`requiresAuth`が設定されていた場合、未認証のユーザーはページ遷移にできない
    routerGuard(next, requiresAuthGuard)
  } else if (to.path === '/signin') {
    // 認証済のユーザーはsigninページへは遷移できない
    routerGuard(next, signinGuard)
  } else {
    next()
  }
})
マイページの作成
認証済ユーザーのみアクセスできるマイページを作成し、その中にサインアウトボタンを設置します。
認証済ユーザーがアクセスできるマイページの作成とサインアウト処理の実装
マイページは認証済ユーザーのみアクセスでき、未認証の場合は/signinページへのリダイレクトを行いたいので、先程実装したナビゲーションガードを利用します。
マイページをルーティングに追加し、metaフィールドのrequiresAuthをtrueにセットします。
こうすることで先程定義したrequiresAuthGuardの対象となり、認証状態のチェックが行われます。
// router.ts
  .
  .
  .
  {
      path: '/mypage',
      name: 'mypage',
      component: () => import('./views/MyPage.vue'),
      meta: { requiresAuth: true },
  },
  .
  .
.また、サインイン/サインアップで使用しているFirebaseUIのsignInSuccessUrlパラメータを/mypageにすることで、サインイン処理後直接マイページにリダイレクトできます。
サインアウト機能
Vuexストアのアクションでサインアウト処理と、ストアで保持しているユーザーデータの破棄を行うactionを定義します。
// store.ts
  .
  .
  .
  actions: {
    .
    .
    .
    signOut ({ commit }) {
      firebase.auth().signOut()
      commit('setUser', null)
    },
  },
これをMyPage.vue内で呼び出します。 また、サインアウト後はthis.$router.push('/')でトップページにリダイレクトしています。
<template>
  <div class="my-page">
    <h1 class="title is-6">Hello, {{displayName}}.</h1>
    <button class="button is-primary" @click="signOut">
      <strong>Sign out</strong>
    </button>
  </div>
</template>

<script lang="ts">
import firebase from 'firebase/app'
import 'firebase/auth'
import { Component, Vue } from 'vue-property-decorator'

@Component
export default class MyPage extends Vue {
  private signOut () {
    this.$store.dispatch('signOut')
    this.$router.push('/')
  }

  get displayName (): string {
    return this.$store.getters.user.displayName || 'Nameless'
  }
}
</script>
データの保存(Cloud Firestore)
ユーザーが作ったデータなどを永続的に保存するにはCloud Firestoreが使用できます。
Firestoreに関しては公式リファレンスのほか、Firebase Advent Calendar 2018 1日目の記事にて、ちょうど詳しく解説されておりますので、熟読することをオススメします。
Firestoreの有効化
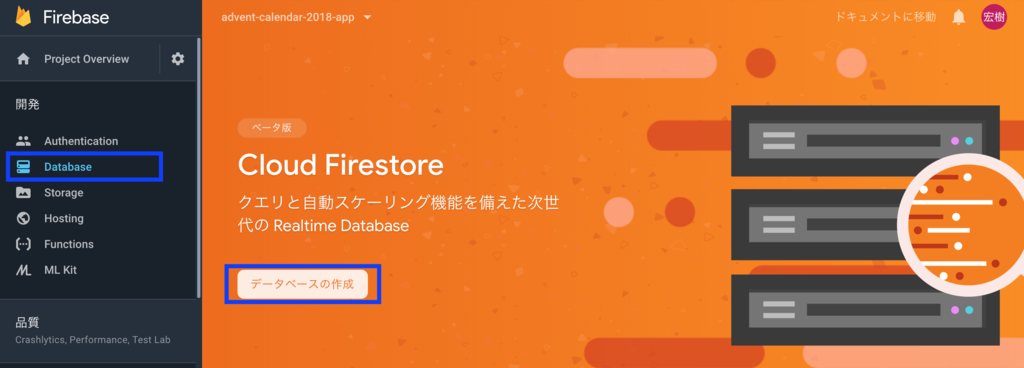
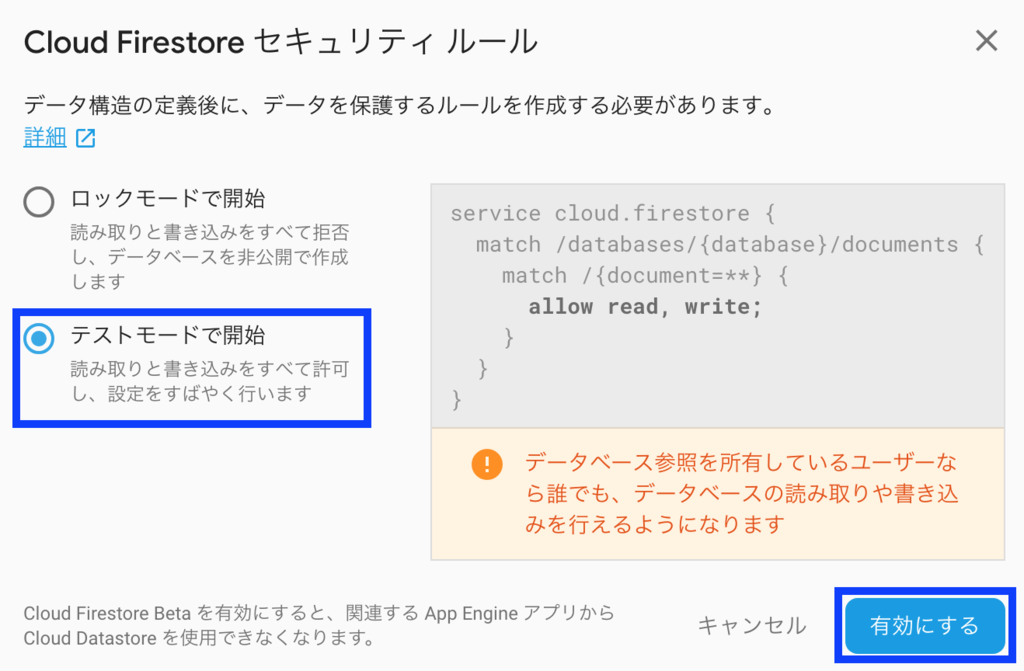
Firestoreの初期設定
まずは、Hostingの際と同様にfirebase initコマンドでFirestoreの初期設定を行います。
$ firebase init
(node:5957) ExperimentalWarning: The fs.promises API is experimental

     ######## #### ########  ######## ########     ###     ######  ########
     ##        ##  ##     ## ##       ##     ##  ##   ##  ##       ##
     ######    ##  ########  ######   ########  #########  ######  ######
     ##        ##  ##    ##  ##       ##     ## ##     ##       ## ##
     ##       #### ##     ## ######## ########  ##     ##  ######  ########

You're about to initialize a Firebase project in this directory:

  /Users/hiroki-sakano/workspace/advent-calendar-2018-app

Before we get started, keep in mind:

  * You are initializing in an existing Firebase project directory

? Which Firebase CLI features do you want to setup for this folder? Press Space to select features,
then Enter to confirm your choices. Firestore: Deploy rules and create indexes for Firestore

=== Project Setup

First, let's associate this project directory with a Firebase project.
You can create multiple project aliases by running firebase use --add,
but for now we'll just set up a default project.

i  .firebaserc already has a default project, skipping

=== Firestore Setup

Firestore Security Rules allow you to define how and when to allow
requests. You can keep these rules in your project directory
and publish them with firebase deploy.

? What file should be used for Firestore Rules? firestore.rules

Firestore indexes allow you to perform complex queries while
maintaining performance that scales with the size of the result
set. You can keep index definitions in your project directory
and publish them with firebase deploy.

? What file should be used for Firestore indexes? firestore.indexes.json

i  Writing configuration info to firebase.json...
i  Writing project information to .firebaserc...

✔ Firebase initialization complete!適切にセキュリティルールを設定して以下のコマンドでセキュリティルールを適用します。
$ firebase deploy --only firestoreサインイン時にユーザーをFirestoreに登録する
サインイン/サインアップ時にユーザーをFirestoreに保存
まず、firestoreの準備ですが、以下のようにtimestampsInSnapshots: trueを指定しないと警告が表示されてしまいます。
const firestore = firebase.firestore()
const settings = {
  timestampsInSnapshots: true,
}
firestore.settings(settings)firestoreを使用するたびに上記の設定を行うのはDRY原則に反するので、src/firestore.tsにて上記の設定を行い、firestoreを使用するファイルでimportして使用します。
import firestore from '@/firestore.ts'ここまで、準備ができればあとはサインイン成功時にユーザーを保存する処理を書くだけです。
FirebaseUIはサインインが成功したときのコールバック関数をオプションで指定できるようになっていますので、それを利用してサインイン時にユーザーをfirestoreに登録します。
  private mounted () {
    let ui = firebaseui.auth.AuthUI.getInstance()
    if (!ui) {
      ui = new firebaseui.auth.AuthUI(firebase.auth())
    }
    ui.start('#firebaseui-auth-container', {
      callbacks: {
        signInSuccessWithAuthResult: (authResult, redirectUrl) => {
          this.saveUser(authResult.user)
          .then(() => {
            this.$router.push('/mypage')
          })
          return false
        },
      },
      signInFlow: 'redirect',
      signInOptions: [
        firebase.auth.GoogleAuthProvider.PROVIDER_ID,
        firebase.auth.EmailAuthProvider.PROVIDER_ID,
        {
          provider: firebase.auth.PhoneAuthProvider.PROVIDER_ID,
          defaultCountry: 'JP',
        },
      ],
    })
  }

  private async saveUser (user: firebase.User) {
    const userRef = firestore.collection('users').doc(user.uid)
    const userDoc = await userRef.get()
    const userData: UserDataType = {}

    if (!userDoc.exists) {
      userData.createdAt = firebase.firestore.FieldValue.serverTimestamp()
    }
    userRef.set(userData, { merge: true })
}saveUser関数がユーザーを保存している処理ですが、初めてサインインしたときのみユーザー作成日時を登録したいので、 まず、サインインに成功したユーザーのIDを元にuserRef.get()でFirestoreに保存されているデータ取得しています。
もし、Firestoreに該当ユーザーのデータが無ければ、createdAtにタイムスタンプを設定します。
最後にuserRef.set(userData, { merge: true })でサインインに成功したユーザーの情報を保存します。merge: trueオプションはすでにユーザーがFirestoreに登録されている際に、指定したパラメータのみ更新するためのオプションです。
例えば、すでにcreatedAtが登録されているUserAに対して、merge: true無しでUserARef.set({})を実行すると、データが完全に上書きされてcreatedAtの値が消去されてしまいます。
また、set関数にmerge: trueを指定した時と似たような機能を持つupdateという関数もありますが、こちらはFirestoreにデータが存在しなければ例外を投げます。
データがFirestoreに存在しない可能性があるときはmerge: trueオプションをつけてsetを呼ぶのが良いですが、データが無いとおかしい場合にはupdateを使うほうが良いでしょう。
また、saveUserが完了するまでリダイレクトしないようにしたいため、callbackでfalseを返すことでリダイレクトしないようにしています。
処理が完了したときにthis.$router.push('/mypage')で自前でリダイレクト処理を行っています。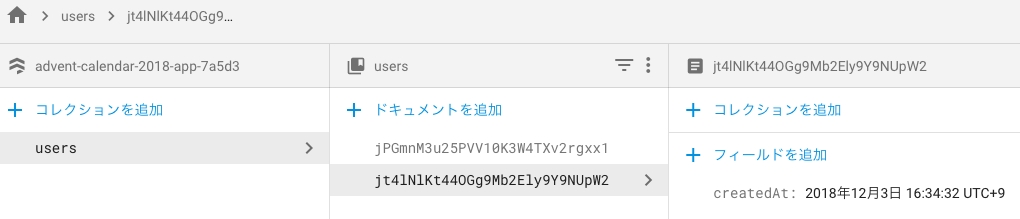
プロフィールテキストの保存
ユーザーがFirestoreに保存できたので、次はマイページでプロフィールテキストを保存できるようにします
プロフィールをHTMLで書き、firestoreに保存できるようにする(プレビュー付き)
フォームに入力された値を使用して、今度は先述のupdate関数を使用してプロフィールと更新日時をFirestoreに保存しています。
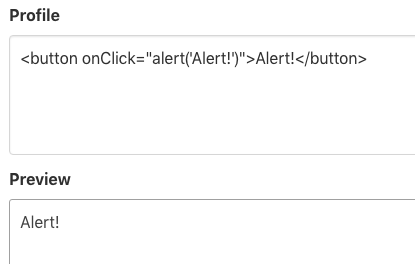
ここで、プロフィールにはHTMLを使用できるようにし、編集時にプレビューも表示できるようにしました。
しかし、このプロフィールテキストをこのアプリの利用者全員に表示できるようにしようとすると、問題が発生します。<script>タグなどがそのまま使用できるため、悪意のあるプログラムをアプリ利用者のブラウザ上で実行できてしまいます。
以下はプロフィールにボタンを押すとアラートを表示するスクリプトを埋め込んだ例です。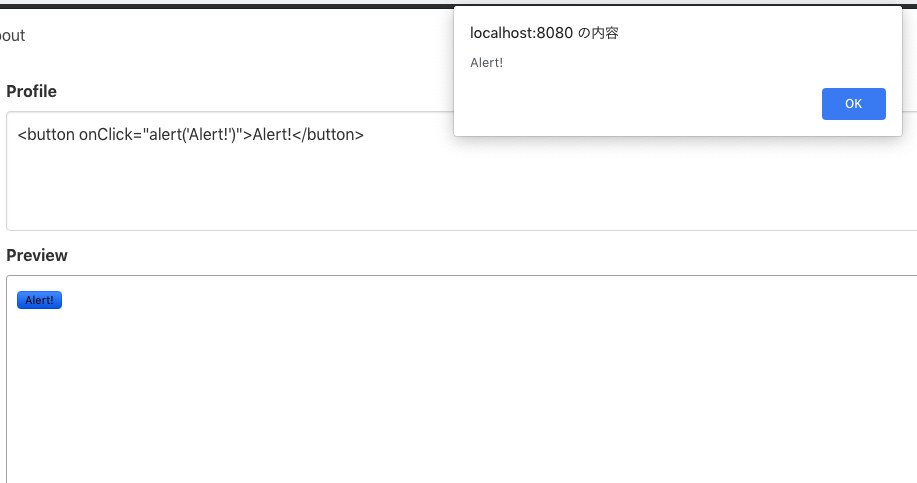
よって、HTMLで書かれたプロフィールを表示する際にはサニタイズを行う必要があります。
サーバーでの処理実装(Cloud Functions for Firebase)
プロフィールのサニタイズをサーバーサイドで行うため、Cloud Functionsを使用します。
Cloud Functionsの初期設定
HostingやFirestoreと同じようにfirebase initコマンドで初期設定を行います。
$ firebase init
(node:13362) ExperimentalWarning: The fs.promises API is experimental

     ######## #### ########  ######## ########     ###     ######  ########
     ##        ##  ##     ## ##       ##     ##  ##   ##  ##       ##
     ######    ##  ########  ######   ########  #########  ######  ######
     ##        ##  ##    ##  ##       ##     ## ##     ##       ## ##
     ##       #### ##     ## ######## ########  ##     ##  ######  ########

You're about to initialize a Firebase project in this directory:

  /Users/hiroki-sakano/workspace/advent-calendar-2018-app

Before we get started, keep in mind:

  * You are initializing in an existing Firebase project directory

? Which Firebase CLI features do you want to setup for this folder? Press Space to select features,
then Enter to confirm your choices. Functions: Configure and deploy Cloud Functions

=== Project Setup

First, let's associate this project directory with a Firebase project.
You can create multiple project aliases by running firebase use --add,
but for now we'll just set up a default project.

i  .firebaserc already has a default project, skipping

=== Functions Setup

A functions directory will be created in your project with a Node.js
package pre-configured. Functions can be deployed with firebase deploy.

? What language would you like to use to write Cloud Functions? TypeScript
? Do you want to use TSLint to catch probable bugs and enforce style? Yes
✔  Wrote functions/package.json
✔  Wrote functions/tslint.json
✔  Wrote functions/tsconfig.json
✔  Wrote functions/src/index.ts
✔  Wrote functions/.gitignore
? Do you want to install dependencies with npm now? Yesこのコマンドを実行すると、functionsディレクトリが作成されます。lint-stagedを使用している場合、functionsディレクトリ以下をlint-stagedの対象外にしないと、コミット時にエラーを吐くので注意が必要です。package.jsonで除外設定が可能です。
   "lint-staged": {
-    "*.ts": [
-      "vue-cli-service lint",
-      "git add"
-    ],
-    "*.vue": [
-      "vue-cli-service lint",
-      "git add"
+    "linters": {
+      "*.ts": [
+        "vue-cli-service lint",
+        "git add"
+      ],
+      "*.vue": [
+        "vue-cli-service lint",
+        "git add"
+      ]
+    },
+    "ignore": [
+      "functions/**"
     ]
また、Cloud Functionsの実行環境はNode.js v6とNode.js v8(Beta版)から選択できますが、デフォルトではNode.js v6環境が使用されます。
Node.js v8を使用したい場合は、functions/package.jsonで設定できます。
Cloud FunctionsでNode.js 8環境で実行する設定
サニタイズを行う関数の定義
必要パッケージのインストール
HTMLで書かれた文字列を受け取り、サニタイズ後の文字列を返す関数を定義します。
まず、サニタイズの実装にはsanitize-htmlというパッケージを使用するので必要パッケージをインストールします。
$ cd functions
$ npm install --save sanitize-html
$ npm install --save-dev @types/sanitize-html
関数定義
functionsで定義出来る関数は大きく分けて以下の2種類があります。
- アプリから呼び出すためのonCall関数
- HTTPリクエスト経由で呼び出すためのonRequest関数
今回はアプリから呼び出したいのでonCall関数を定義します。
https://github.com/h-sakano/advent-calendar-2018-app/blob/master/functions/src/index.ts
このコードの詳細は省きますが、ざっくり説明すると、アプリからtextパラメータを受け取り、サニタイズして、サニタイズ後のテキストをsanitizedTextとして返しています。
Cloud Functionsへのデプロイ
以下のコマンドで関数がデプロイされて、アプリから呼び出し可能な状態になります。
$ firebase deploy --only functionsクライアント側からの呼び出し
プロフィール編集時、500ミリ秒未入力状態が続いた時に、プロフィールに入力されたHTMLをサニタイズした上でプレビューを更新する
まず、Cloud FunctionsのSDKをインポートします。
import 'firebase/functions'先程定義したCloud Functionsの関数は以下のように呼び出すことができます。
const sanitizeFunc = firebase.functions().httpsCallable('sanitize')
const response = await sanitizeFunc({ text: this.profile })
this.sanitizedProfile = response.data.sanitizedText
プレビューを入力してから、500ミリ秒間未入力の状態が続いたらこの関数が呼ばれるようにしています。
この機能を実装するために、lodashのdebounceを使用しています。
$ yarn add lodash
$ yarn add -D @types/lodash
import firebase from 'firebase/app'
import 'firebase/auth'
import 'firebase/functions'
import _ from 'lodash'
import firestore from '@/firestore'
import { Component, Vue, Watch } from 'vue-property-decorator'
  .
  .
  .
  private created () {
    this.debouncedSanitize = _.debounce(this.updateSanitizedProfile, 500)
  }

  private async updateSanitizedProfile () {
    const sanitizeFunc = firebase.functions().httpsCallable('sanitize')
    const response = await sanitizeFunc({ text: this.profile })
    this.sanitizedProfile = response.data.sanitizedText
  }

  @Watch('profile')
  private watchProfile (val: string, oldVal: string) {
    this.debouncedSanitize()
  }
  .
  .
  .
サニタイズ後
プロフィール画像のアップロード(Cloud Storage)
Cloud Storageの初期設定
https://github.com/h-sakano/advent-calendar-2018-app/commit/2d200e831a06ff5b52f35463cc4f5be3d44c8628
例によってfirebase initで初期設定を行います。
$ firebase init
(node:29941) ExperimentalWarning: The fs.promises API is experimental

     ######## #### ########  ######## ########     ###     ######  ########
     ##        ##  ##     ## ##       ##     ##  ##   ##  ##       ##
     ######    ##  ########  ######   ########  #########  ######  ######
     ##        ##  ##    ##  ##       ##     ## ##     ##       ## ##
     ##       #### ##     ## ######## ########  ##     ##  ######  ########

You're about to initialize a Firebase project in this directory:

  /Users/hiroki-sakano/workspace/advent-calendar-2018-app

Before we get started, keep in mind:

  * You are initializing in an existing Firebase project directory

? Which Firebase CLI features do you want to setup for this folder? Press Space to select features,
then Enter to confirm your choices. Storage: Deploy Cloud Storage security rules

=== Project Setup

First, let's associate this project directory with a Firebase project.
You can create multiple project aliases by running firebase use --add,
but for now we'll just set up a default project.

i  .firebaserc already has a default project, skipping

=== Storage Setup

Firebase Storage Security Rules allow you to define how and when to allow
uploads and downloads. You can keep these rules in your project directory
and publish them with firebase deploy.

? What file should be used for Storage Rules? storage.rules

i  Writing configuration info to firebase.json...
i  Writing project information to .firebaserc...

✔  Firebase initialization complete!
生成されたstorage.rulesをデプロイします。
$ firebase deploy --only storageここまで完了すると、接続用スニペットにstorage URLが表示されるようになりますので、main.tsに貼り付けたコードスニペットを更新します。
接続情報の確認
接続情報
なお、storage.rulesをdeployしてからストレージが使用可能になるまで時間がかかるようです。
これ以降の手順でコンソールに400エラーが出る場合は、まだストレージが利用可能になっていない可能性があります。
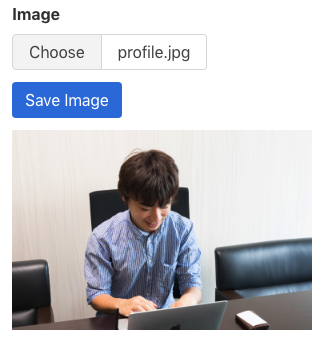
Cloud Storageへの画像の保存と表示
プロフィール画像を保存できるようにする
まず、Cloud StorageのSDKをインポートします。
import 'firebase/storage'saveImage関数でストレージにファイルをアップロードした上で、URLをFirestoreに保存しています。
  private saveImage () {
    const storageRef = firebase.storage().ref()
    if (this.selectedFile) {
      const imageRef = storageRef.child(`${this.$store.getters.user.uid}/${this.selectedImageFileName}`)
      imageRef.put(this.selectedFile)
      .then((snapshot) => {
        snapshot.ref.getDownloadURL().then((downloadURL) => {
          this.imageUrl = downloadURL
          firestore.collection('users').doc(this.$store.getters.user.uid).update({
            imageUrl: downloadURL,
            updatedAt: firebase.firestore.FieldValue.serverTimestamp(),
          })
        })
      })
    }
}まず、firebase.storage().ref()でバケットのルートの参照を取得し、次にstorageRef.child(<ユーザーID>/<ファイル名>)でアップロードするファイルの参照を生成します。
参照を生成したら、put関数でファイルをアップロードできます。
アップロードが完了したら、snapshot.ref.getDownloadURL()で画像のURLを取得し、FirestoreのUserドキュメントに保存します。
これで、Storageに保存した画像がユーザーに紐付けて保存することができましたので、createdライフサイクルフックでプロフィールのテキストと同時にURLもロードして、画像を表示することが可能です。
private created () {
    .
    .
    .
    firestore.collection('users').doc(this.$store.getters.user.uid).get()
    .then((doc) => {
      const userData = doc.data()
      if (doc && userData) {
        this.profile = userData.profile
        this.imageUrl = userData.imageUrl
      }
    })
  }
まとめ
今回はサンプルアプリを通して、Authentication, Firestore, Functions, StorageといったFirebaseが提供する基本的な機能をVue.jsで扱う方法を紹介しました。
サンプルアプリは機能の使用方法の紹介に焦点を当てているため、意味の無いアプリになっていますが、うまく組み合わせればアイデア次第で面白いWebサービスを作れそうです。